In this post I will quickly show you how to easily use drone.io and GitHub in combination with Docker to test your self developed Graylog2 plugins. Here is a brief […]
In this post I will quickly show you how to easily use drone.io and GitHub in combination with Docker to test your self developed Graylog2 plugins. Here is a brief overview of what is covered:
As we are currently evaluating Graylog2 as a central log collector and processor we soon realised that we would need quite some additional processing options (beyond what is built-in the product) that we were luckily able to add via Graylog2’s built-in plugin mechanism. As we are using Docker images for our tests it soon turned out to be quite cumbersome to integrate the plugins into the standard image (in the long run cat 'plugin.jar' | nc 'graylog2-server' appeared not to be the greatest deployment option, as described in Creating a Graylog2 Output Plugin).
So we setup to push the plugin code to our Git repository from where drone.io would build it on every commit. Once commited we would run a docker build and start our automated testing via the Graylog2 API and our PowerShell modules (as quickly described in Sending Gelf messages to Graylog2 via PowerShell and Using Graylog2 REST API via PowerShell).
Setting up drone.io integration
I personally had no previous experience with drone.io and just randomly picked it from the several available options you find on the internet. Though I read at drone.io vs. codeship.io and some other sources that this service was by far only basic and somehow stalling it actually seemed to fulfill everything I needed, as I was able to quickly integrate it with my GitHub repo and publish the generated artifact. So here it is step by step …
Setting up the account
Setting up an account with drone.io is easy when we already have a GitHub login (or BitBucket or GoogleCode). We only have to authorize drone.io in in GitHub, select a username and we are good to go.
Note: I chose the free subscription with inlimited public repos (but no private repos). This corresponds to our GitHub subscription, where we also have public repos.
Adding a repository
Once logged in and connected to our code repositories we can select from a list of available projects.
Selecting the programming language/environment
Though you can select the language of your repository in GitHub you still see those repositories that drone.io cannot build. In our case we choose Java.
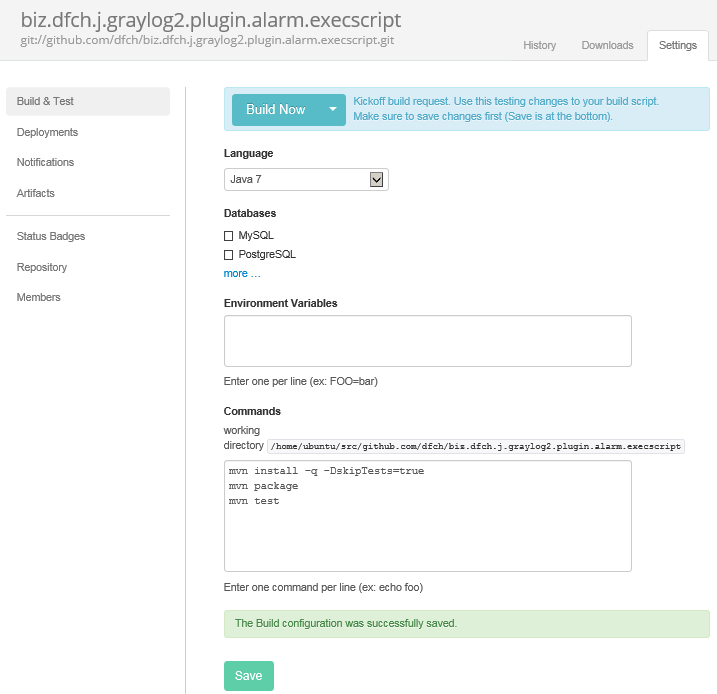
Defining the build process/commands
For our Maven project I added mvn package and left the other commands as is.
,
Defining the artifacts available for download
We can also specify which artifacts are available for download after a successful buil by specifying a wildcard or a filename as a relative path (under target for our maven project). In our example the plugin will be available for download at /files/target/execscript-1.0.0-SNAPSHOT.jar (so drone.io essentially recreates the folder structure of your project).
Initiating a build
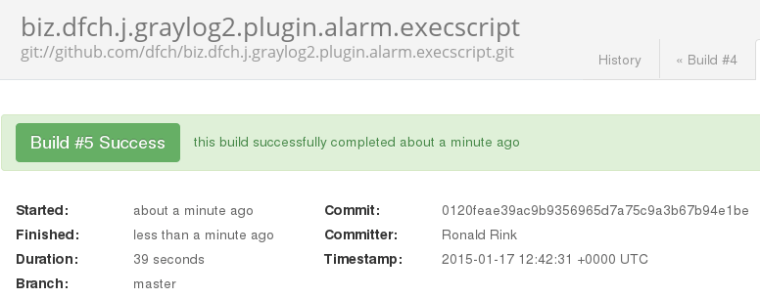
At this point we have defined everything that is necessary for our build to be started. In contrast to other services you can manually start a build process.
Once clicked we see the build process updating as it occurs (via WebSockets as it is described in this Google Developers video).
Checking the build status
After the build finishes you get one of those typical green or red indicators (preferrably green).
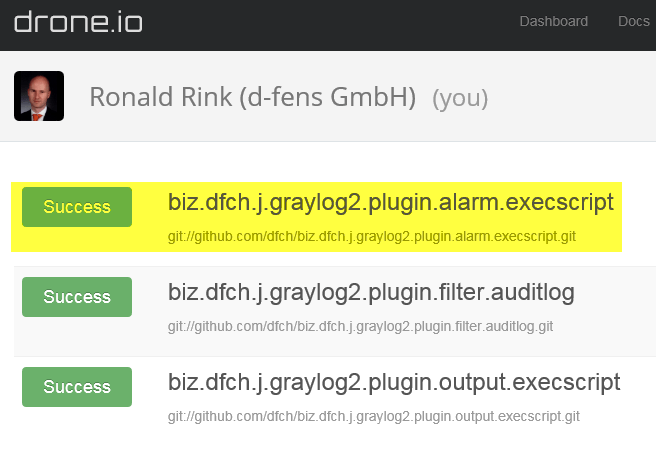
In addition you see the status of all your repositories on the dashboard/main page – flawless as one would expect …
… and you can link to it via a visually very intriguing badge in your GitHub README or whereever you deem this show-off to be suitable (and yes, other services in this area have this feature as well).
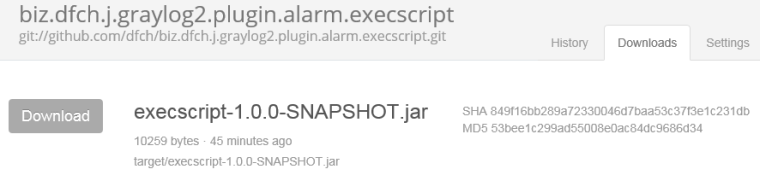
And this will come as no surprise – upon successful build the generated artifact is available for download:
Creating the Dockerfile
Now that we have automatically built our plugin we will create a new Docker image with a new Dockerfile. To create a new one I essentially copied the existing Dockerfile, set it to the source in the FROM statement and started downloading the jars from drone.io.
This file contains hidden or bidirectional Unicode text that may be interpreted or compiled differently than what appears below. To review, open the file in an editor that reveals hidden Unicode characters. Learn more about bidirectional Unicode characters
The build process with Docker is pretty straightforward by just issuing docker build in the same directory as the Dockerfile. And a check afterwards reveals that the image was indeed created successfully:
[root@centos70 docker]# docker build -t dfch/dfchgraylog2plugins .
[root@centos70 docker]# docker images | grep -i graylog
REPOSITORY               TAG    IMAGE ID     CREATED        VIRTUAL SIZE
dfch/dfchgraylog2plugins latest 9a3ba44205e4 27 minutes ago 1.161 GB
graylog2/allinone        latest 08776b5f9ce9 2 days ago     1.16 GB
During the build we see that the Plugins are pulled from the drone.io repo:
Note: After trying to run the image for the first time, I got some strange errors, as my Graylog2/allinone:latest was abviously not really the latest anymore. So I actually had to docker pull that image and re-run the build process. As it seems docker build does not check if your local images are really up to date.
Running the Graylog2 image with our plugins
Running the image is just like running the regular graylog2/allinone image. After starting it I checked if the plugins were really downloaded (which they were) …
[root@centos70 docker]# docker run -d -P -i dfch/dfchgraylog2plugins
713df73f42dd
[root@centos70 docker]# docker exec -t -i dfch/dfchgraylog2plugins /bin/bash
root@713df73f42dd:/# ll /opt/graylog2/plugin/
total 40
drwxr-xr-x.  2 root root  4096 Jan 17 14:16 ./
drwxr-xr-x. 12 root root  4096 Jan 15 08:30 ../
-rw-r--r--.  1 root root  6916 Jan 17 14:15 auditlog-1.0.0-SNAPSHOT.jar
-rw-r--r--.  1 root root 10259 Jan 17 14:15 execscript-1.0.0-SNAPSHOT.jar
-rw-r--r--.  1 root root  8574 Jan 17 14:16 execscript-1.0.0-SNAPSHOT.jar.1
root@713df73f42dd:/#
[root@centos70 idea]#
Note: Here you can see that both the AlarmCallback and the Output plugin originally use the same file name.
… then I logged in to Graylog2 to check if the node would recognise the plugins:
Note: Even while wget downloaded the file under a different name, Graylog2 still loaded the plugin without any errors.
Summary
Though drone.io provides really only a very basic service, it is sufficient to connect it with your GitHub or BitBucket repositories to have an automated build (I did not test the Google Code integration). As this works with either private or public repos (private repos require a paid subscription; you might want to check with codeship.io – they also allow you to use some private repos for free) this is an easy way to automatically build, deploy and test your Graylog2 plugins without the need to setup a complete infrastrcture yourself. Gettings this whole thing setup actually took longer than the write-up you are just reading …
Notes
There are several things that could be improved with this approach. Amongst others …
Substitute the Plugin version with variables inside the Dockerfile and have tags to be able to download specific versions
In case modifications of the plugins are needed, you could also add some REST calls to the initial CMD in the Dcokerfile to configure them after startup
Do not use SNAPSHOT versions …
Have an automatic import of the existing Dockerfile for easy adding our own plugins
If you have any feedback or suggestions or better ways to do this, I would be glad to hear your comments from you!


 ,
,


4 Comments »