There are several ways on how to create a PowerShell (script) module. And depending on your environment chances are high you are not the only developer contributing to a module. And if you care about versioning that is a little bit more sophisticated than just creating directories with semi-sequential version numbers this blog post might be something for you.
I will describe how you can use the ‘Feature Branch GitFlow’ from SourceTree in combination with manifest based NestedModules to facilitate PowerShell module developing. Here is a brief overview of what is covered:
The Tools
For this article to follow you would need the following tools and resources
- Microsoft PowerShell v3.0+ (obviously)
- Atlassian SourceTree v1.6.14+ (or any command line git client like Git for Windows, but then you have to type the commands manually)
- A GitHub account and repository (this will essentially work with any Git repository but SourceTree natively only supports BitBucket, Stash and GitHub)
- your favourite text editor like Notepad++ to create some scripts
Structure of a PowerShell module
As written before PowerShell modules can be created in different ways. Here we will only focus on PowerShell script based modules (as opposed to C# based modules). There you basically have two choices:
- Create a
module with all script code in a large PSM1 file
- Create a
manifest based module with a PSD1 file describing the module and the actual functions and Cmdlets in separate source files.
With a PSD1 you have much more fine-grained control over how your module is versioned and what will essentially be exported and advertised. For more information on module manifests see How to Write a Module Manifest.
As you can see from the following listing the manifest based module biz.dfch.PS.System.Utilities has defined a version number and NestedModule (in contrast to the PSM1 based module biz.dfch.PS.Rapid.Utilities):
PS > Get-Module
ModuleType Name                            ExportedCommands
---------- ----                            ----------------
Script     biz.dfch.PS.Rapid.Utilities     {ConvertFrom-Epoch, ConvertTo-Epoch, Get-RapidBillingPeriod, Get-Bill...
Script     biz.dfch.PS.System.Logging      {Out-Message, Out-MessageAlert, Out-MessageCritical, Out-MessageDebug...
Script     biz.dfch.PS.System.Utilities    {Assert-CmdletDocumentation, ConvertFrom-Base64, ConvertFrom-CmdletHe...
Manifest   Microsoft.PowerShell.Management {Add-Computer, Add-Content, Checkpoint-Computer, Clear-Content...}
Manifest   Microsoft.PowerShell.Utility    {Add-Member, Add-Type, Clear-Variable, Compare-Object...}

PS > Get-Module biz.dfch.PS.System.Utilities | fl
Name              : biz.dfch.PS.System.Utilities
Path              : C:\data\PSModules\biz.dfch.PS.System.Utilities\biz.dfch.PS.System.Utilities.psm1
Description       :
ModuleType        : Script
Version           : 1.0.6.20150315
NestedModules     : {New-CustomErrorRecord, Format-Xml, ConvertFrom-UnicodeHexEncoding, ConvertFrom-SecureStringDF...}
ExportedFunctions : {Assert-CmdletDocumentation, ConvertFrom-Base64, ConvertFrom-CmdletHelp, ConvertFrom-Hashtable...}
ExportedCmdlets   :
ExportedVariables : biz_dfch_PS_System_Utilities
ExportedAliases   : {ConvertFrom-ExchangeEncoding, fx}

PS > Get-Module biz.dfch.PS.Rapid.Utilities | fl
Name              : biz.dfch.PS.Rapid.Utilities
Path              : C:\data\PSModules\biz.dfch.PS.Rapid.Utilities\biz.dfch.PS.Rapid.Utilities.psm1
Description       :
ModuleType        : Script
Version           : 0.0
NestedModules     : {}
ExportedFunctions : {ConvertFrom-Epoch, ConvertTo-Epoch, Get-RapidBillingPeriod}
ExportedCmdlets   :
ExportedVariables : biz_dfch_PS_Rapid_Utilities
ExportedAliases   : Get-BillingPeriod
To facilitate module developement we will have our exported Cmdlets and functions (or groups thereof) defined in separate PS1 files. So with biz.dfch.PS.System.Utilities as an example the file structure would look like this (every exported Cmdlet is defined in a single PS1 file with the same name):
# script file that will be executed prior to module loading
Import-Module.ps1

# manifest and description of module
biz.dfch.PS.System.Utilities.psd1

# main module file used for module initialisation
biz.dfch.PS.System.Utilities.psm1

# module configuration file
biz.dfch.PS.System.Utilities.xml

# license and general readme
LICENSE
NOTICE
README.md

# script files
ConvertFrom-Base64.ps1     # contains ConvertFrom-Base64 Cmdlet
ConvertFrom-CmdletHelp.ps1 # contains ConvertFrom-CmdletHelp Cmdlet
ConvertFrom-Hashtable.ps1  # contains ConvertFrom-Hashtable Cmdlet
# more script files ...
With this approach we can easily work on the same module ond separate Cmdlets (and thus files) with multiple developers. See the GitHub biz.dfch.PS.System.Utilities repository for the actual files and their contents (or check the sameple repository biz.dfch.PS.Testing.Example1 I created for this blog post).
GitFlow with Feature Branch
Git defines several workflows that facilitate developement (based on Vincent Driessen’ article A successful Git branching model). Of course it is always a personal preference but for developing separate Cmdlets the Git Feature Branch Workflow seems quite well suited.
This means you will create a feature branch for each Cmdlet (or group of Cmdlets) we create and commit that to the development branch via an intermediate feature branch. As we have divided the code in separate files the only shared file is the PSD1 file where we have to adjust NestedModules and possibly a few settings like FileList and RequiredAssemblies.
Every time we have finished a feature we can simply commit this to the development branch (and optionally create a release from it that will eventually pushed to the master branch).
Workflow
With these two approaches in mind we can now create a new PowerShell module and show with an example on how to create a new Cmdlet via a feature branch that we will later merge into the development branch and create a release from it.
- Creating a new repository
- Initialise the repository with GitFlow
- Creating a Feature
- Creating a Release
Creating a new repository
We will call our repository biz.dfch.PS.Testing.Example1 and will host it as public repository on GitHub at dfch / biz.dfch.PS.Testing.Example1. We can create the repository directly from within SourceTree or via the web interface:

Note: certain aspects of the repository can only be edited via the web interface. So you can also create the repository via the web interface and then clone it from within SourceTree to you local disk.
Initialise the repository with GitFlow
All GitFlow actions and commands are available under the menu ‘Repository / GitFlow’:

From there we will select Initialise repository and use the default options:

In case we get an error message as shown below, this means that there is no master branch yet in our repository (which can happen if we just created an empty repository):
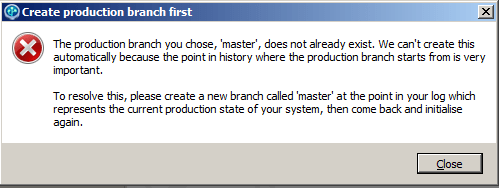
To circumvent this we will commit and push an empty project with some default documents to the master branch:

After retrying the repository initialisation we will end up with a message similar to this (as you can see we can always specify all Git command manually from the console):

Creating a Feature
To actually create a feature we start another GitFlow command Start Feature. The name of the feature can nearly be anything, but it should be concise and still be descriptive:

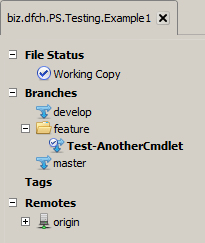
After creating the feature we will notice a new branch Test-AnotherCmdlet in our SoruceTree view:
Our feature will be a Cmdlet called Test-AnotherCmdlet that will echo all input back to the console. This Cmdlet will be placed into the file Test-AnotherCmdlet.ps1.
After having edited the feature we should commit and push the feature to the feature branch (not development or master), so other developers would have a chance to view or work on it:

After the push the web view should look similar to this:

When the feature is finished, we invoke another GitFlow command Finish Feature (or of course we could start another feature in parallel):

Finishing the feature means, we will merge it with the develop branch:

So essentially we only added our new source file Test-AnotherCmdlet.ps1 and updated the PSD1 file as you can see from our commit 192fcb8. Other developers could have been adding features at the same time without worrying too much about collisions (except for the shared PSD1 file which could always easily be merged).
Creating a Release
Now everything we developed is in the develop branch waiting to be ‘released’. This means we start another GitFlow to create a release branch (1.0.1 in our case):

We can still commit something to this branch, such as an updated readme file:

Once we are happy with our release we finish it by invoking the respective GitFlow workflow:

This means we will merge the release branch with the develop and master branch. This can also be viewed on the web repository where you will see we now have a release 1.0.1 (that is currently the same as the master and development branch):

As we also defined a tag we can always reference this point in time and look it up ander ‘Releases’ and ‘Tags’ in the web repository:

Summary
